Save
Save I still remember the December afternoon my grandmother pulled a freshly baked gingerbread house from her oven, the kitchen filling with that unmistakable warmth of cinnamon, ginger, and molasses. She let me decorate it with royal icing and candies, teaching me that the most magical holiday centerpieces aren't just beautiful—they're edible, shareable, and made with your own hands. This gingerbread house frame became my favorite way to transform a dessert into a conversation starter, a frame that holds cookies and treats like edible artwork on a festive table.
Years ago, I made this for a holiday dinner party, and my usually chatty guests went quiet when they saw the house sitting on the table. They thought I'd bought it from a fancy bakery. Watching them realize it was homemade, then bite into a piece of the frame itself, made me understand that sometimes the best food moments aren't about perfection—they're about the genuine surprise and delight on someone's face.
Ingredients
- All-purpose flour (300 g): The foundation of your dough—it needs to be sturdy enough to hold the house's weight, so don't skip the measuring cup. Brown sugar (100 g): Creates a deeper molasses flavor that feels more festive than white sugar, and gives you that rich caramel color
- Unsalted butter (100 g), softened: Room temperature is everything here—it creams into the sugar like silk, making the dough tender rather than tough. Cold butter will fight you
- Molasses or dark honey (100 g): This is where the soul of gingerbread lives. Molasses gives you that dark, slightly bitter depth that makes people taste autumn and warmth
- Egg (1 large): Your binder—it holds everything together and helps the dough stay cohesive through the baking and building
- Ground ginger (1 tsp): The warm spice that whispers to you from the kitchen. Fresh ginger won't work here; you need the intensity of ground
- Ground cinnamon (1 tsp): The flavor that says 'holiday' without speaking a word
- Ground cloves (½ tsp): Just enough to add mystery and warmth without overwhelming. Too much tastes medicinal
- Baking soda (½ tsp): Gives you that gentle lift and tender crumb structure
- Salt (¼ tsp): Balances the sweetness and deepens all the spice flavors
- Egg white (1): For royal icing—this becomes your edible glue that sets hard as stone
- Powdered sugar (200 g), sifted: Must be sifted or your icing will be lumpy and unworkable. This non-negotiable step takes two minutes and changes everything
- Lemon juice (½ tsp): A secret ingredient that brightens the icing and prevents it from tasting one-dimensional
- White chocolate (50 g), melted: For drizzles and details—it's forgiving and beautiful when it hardens
- Assorted candies: White and brown candies (chocolate buttons, white sprinkles, mini marshmallows) give you dimension. Choose candies that won't bleed color onto your icing
- Edible glitter or silver pearls (optional): The finishing touch that catches light and makes everything feel celebratory
Tired of Takeout? 🥡
Get 10 meals you can make faster than delivery arrives. Seriously.
One email. No spam. Unsubscribe anytime.
Instructions
- Creaming butter and sugar:
- In a large bowl, cream together softened butter and brown sugar until the mixture looks pale, fluffy, and lighter in color than when you started. This should take about two to three minutes with an electric mixer. You're incorporating air into the butter, which helps the finished cookies stay tender. When you lift the beaters, the mixture should fall in soft ribbons.
- Bringing in moisture:
- Add one large egg and the molasses to the butter mixture. Beat well until everything is combined into a smooth, rich base. The molasses will darken everything, and that's exactly right. The mixture should be completely homogeneous with no streaks of butter showing.
- Preparing dry ingredients:
- In a separate bowl, whisk together flour, ground ginger, cinnamon, cloves, baking soda, and salt. Whisking aerates the flour and distributes the spices evenly so no bite is over-spiced or bland. Take your time here—you want the spices visible throughout the dry mixture.
- Bringing dough together:
- Gradually add the dry ingredients to the wet mixture, stirring by hand or with the mixer on low speed. Stop as soon as you see no white flour streaks. Overworking develops gluten and makes tough cookies, which is the opposite of what you want. The dough should come together into a cohesive ball that doesn't stick to your hands.
- Chilling the dough:
- Wrap the dough in plastic wrap and refrigerate for at least 30 minutes. This gives the flavors time to meld and makes the dough easier to roll and cut. I often do this the night before, which deepens the spice flavors and makes the dough even easier to handle. Cold dough doesn't spring back when you cut shapes.
- Prepping your workspace:
- Preheat your oven to 180°C (350°F) and line a baking sheet with parchment paper. There's something reassuring about this step—you're setting the stage for success. Cold oven, no go. Parchment paper prevents sticking and gives you perfectly even bottoms.
- Rolling and cutting:
- On a floured surface, roll the dough out to about 5 mm thickness. If your dough cracks at the edges, it's too cold—let it warm for a minute or two. Use gingerbread house templates (or cut your own shapes with a knife) to create front, back, sides, and roof panels about 10–12 cm per panel. Work gently so the edges stay clean and the pieces stay strong.
- Baking:
- Place pieces on the baking sheet and bake for 10–12 minutes. Watch them closely toward the end—you want the edges to be just firm and slightly darker, but the centers should still feel slightly soft. They'll continue to firm up as they cool. Overbaking makes them brittle and prone to cracking during assembly.
- Cooling:
- Transfer the pieces to a wire rack and cool completely. This is non-negotiable—warm pieces are still fragile. Once cooled, they'll be sturdy enough to handle and cut straight lines if needed. You can assemble now or store them airtight for up to a day.
- Making royal icing:
- In a clean bowl, beat one egg white to soft peaks. The egg white should be at room temperature and completely free of yolk, or it won't whip properly. Gradually add sifted powdered sugar and lemon juice, beating constantly. The mixture will go from loose and glossy to thick, stiff peaks that stand straight up. This is your edible cement—it hardens rock-hard and holds the house together.
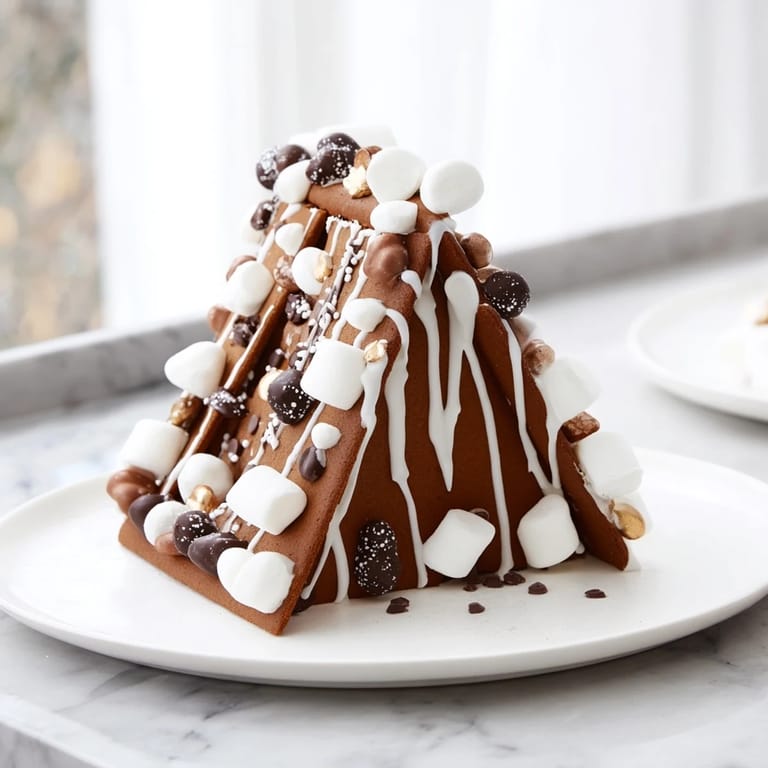
- Assembling the frame:
- This is where patience becomes your greatest tool. Using a small spatula or butter knife, apply royal icing to the edges of your gingerbread pieces. Press them together at right angles, holding each connection for 30 seconds or so until the icing grabs. Build the walls first, then attach the roof at an angle. As you work, the icing underneath begins to set, creating a stronger structure. Let the entire frame dry for at least 30 minutes before decorating—this is essential.
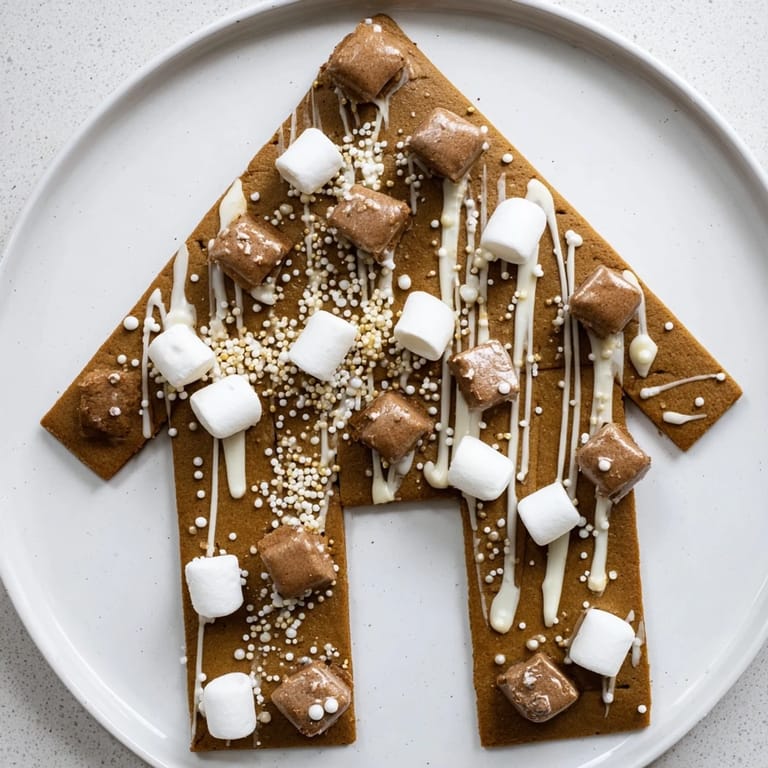
- Decorating:
- Once the structure is solid, this is where your creativity takes over. Pipe or drizzle white chocolate along the seams and edges. Stick candies on with small dots of royal icing, pressing gently until they stay. Add sprinkles, mini marshmallows, chocolate buttons—whatever feels festive. The icing acts as glue, so work methodically and let each area set before moving on. Dust with edible glitter or pearl dust if you like. This is the moment when your house truly comes alive.
- Finishing touch:
- Once fully set, place the gingerbread house frame on a beautiful platter. Arrange additional cookies, nuts, candied fruits, or holiday treats around the house to complete the festive border. The frame becomes the focal point, and everything around it becomes part of the composition. Step back and admire what you made with your own hands.
 Save
Save I'll never forget the moment my sister's three-year-old took her first bite of the gingerbread frame, her eyes widening with the realization that the pretty centerpiece was actually food. She giggled and said, 'We're eating the house!' That's when I understood that this recipe transcends being just another holiday dessert—it's a moment of wonder wrapped in edible craftsmanship.
The Architecture of Sweetness
Building a gingerbread house teaches you something beautiful about patience and structure. Each piece must be strong enough to support itself and its neighbors, which is why rolling to exactly 5 mm thickness and baking just until firm matters so much. Too thin, and your walls collapse like a sweet dream. Too thick, and they become heavy and difficult to work with. The spices in the dough do more than flavor—they strengthen the structure slightly and create that wonderful depth that makes gingerbread taste like tradition. The architecture you're creating is both delicate and surprisingly sturdy, much like the memories attached to it.
Timing and Temperature
Gingerbread rewards planning ahead. The dough is genuinely better when chilled overnight, allowing the spices to bloom and mellow into something more sophisticated than they taste when fresh. The royal icing needs time to set—rushing this step leads to leaning walls and collapsed dreams. Temperature also matters in unexpected ways: warmer kitchens need slightly thicker icing, and cold dough resists spring-back when cut. Every variable is connected, and honoring that connection is what separates a wobbling house from an architectural triumph.
Creative Freedom Within Tradition
While gingerbread houses are rooted in tradition, there's beautiful freedom in how you interpret yours. The shape of each panel can change. The color can go deeper with cocoa powder or stay traditional brown. The decorations can be minimalist and elegant or maximalist and joyful. Some bakers make their royal icing with aquafaba instead of egg white for vegan versions. Others add a touch of orange zest to the dough for brightness. The house frame becomes a reflection of your kitchen personality and the people you're cooking for. That's where the real magic lives.
- Paint the dried icing with edible food coloring mixed with vodka for intricate designs that last longer than fresh icing details
- Store finished gingerbread pieces airtight for up to five days before assembly to ensure maximum structural integrity
- If a piece breaks during assembly, patch it with extra royal icing and hold it together longer until set—it's almost invisible once decorated
 Save
Save This gingerbread house frame is a reminder that the most meaningful food moments are built layer by layer, with patience, intention, and a little creativity. Make it with someone you love, or make it alone and fill your kitchen with the warmth of spice and possibility.
Kitchen Guide
- → How do I ensure the gingerbread panels are sturdy?
Chill the dough thoroughly before rolling and bake the panels until the edges are firm but not overbrowned. Baking a day ahead and storing airtight improves durability.
- → What ingredients provide the distinct flavor in the dough?
Ground ginger, cinnamon, and cloves, combined with molasses, create the characteristic warm and spicy notes in the dough.
- → How is royal icing prepared and used here?
Beat egg white to soft peaks, then gradually add sifted powdered sugar and lemon juice until thick and glossy. It acts as an adhesive to assemble and decorate the frame.
- → Can the decoration be customized?
Yes, use a variety of white and brown candies, white chocolate drizzles, and edible glitter or silver pearls to fit holiday themes or personal taste.
- → What tools help in assembling the frame accurately?
Use a gingerbread house template or knife, rolling pin, piping bag for icing, and baking sheets lined with parchment paper for clean baking and assembly.
- → Are there any allergen considerations?
This contains wheat flour, eggs, and dairy butter. Verify candy decorations for allergens before use.